Guitar
Alliance Absolute Beginners Series: Lesson One
by Daniel L. Halberg,
PhD (a.k.a. SlowBlues)
Table of Contents:
Introduction
Philosophy of the Series
Purpose of the Series
Organization of the
Series
Lesson
Ergonomics of Playing Guitar
Tuning Up
Warm Up
Rhythm Practice
Lead Practice
Conclusion
Introduction
and Philosophy of the Series: (Back
to Top)
When sat down to write these lessons, I started by trying to think about the
single question that underpins this entire series, which is:
What does it mean to be an "absolute beginner"?
This was a harder question to answer than I had at first anticipated because
this is a special audience. All of you reading this are "seekers".
Meaning, just like me, you were looking for the solution...the key to learning
guitar. So, my basic guess is that you decided to try out GuitarAlliance because
of one of the following reasons:
a) you couldn't learn from a teacher (more likely, you couldn't find a teacher
who could actually teach!);
b) every book you read just seems to be a little too hard...even the ones that
say "easy" on them! Don't feel bad - I bought them ALL - and they
are all like that!;
c) you've already looked on the internet for help, but either couldn't find
what you were looking for, or were completely overwhelmed with information.
Maybe there are other reasons or a combination of reasons. Regardless, I imagine
that you have tried some other sources, with only marginal success. You are
probably still struggling with playing anything that resembles a song, or you
can "kinda sorta" play a song or part of a song.
Maybe you are decent at one aspect of playing (say playing single note runs)
but you are having trouble developing skill at a different aspect (say strumming
a constant rhythm). You know in your heart that you must develop the weaker
skill, but you can't derive the fundamentals for getting there.
Maybe you are not struggling or frustrated just yet. You just bought your guitar
yesterday or last week and want the fastest way possible to playing some great
songs, or to even write your own!
If any of that sounds like you, then you definitely have some "absolute
beginner" in you!
Purpose of
the Series: (Back to Top)
If you are still with me after reading the above section, I'll assume that
you really want to move out of being an absolute beginner - or you are at least
curious as to my approach! If you allow me a few more words before we get to
the actual playing, I would like to explain further the purpose of this series
and what you can expect.
First the details...and an admission...I am not a guitar virtuoso! I didn't
pick up my guitar and start playing Hendrix tunes. Heck, I when I first started, "Ode
to Joy" was a real challenge. I could just barely manage "Mary had
a Little Lamb". In fact, I brought my guitar to the Guitar Store and told
the GSG (Guitar Shop Guy) that my guitar was broken! I am so glad he didn't
laugh me out of the store. He just explained that some of the things I was
trying to do would physically take time. So, in hindsight, I had to accept
that, intellectually, I am a very fast learner...but on the guitar, I am just
average.
What I also realized is that most of the guitar playing world is pretty much "sink
or swim". Meaning you either get it or you don't. Well, these lessons
are intended to change that. For everyone, the initial stages of guitar playing
seem extremely difficult. Did I say extremely, I meant to say DARN NEAR IMPOSSIBLE!
Guitar is physically demanding instrument. The sooner we can admit that - the
sooner we can conquer it!
Here is another observation. Most guitar method books are not written for the
absolute beginner. There is often too big of a leap from lesson one to lesson
two with regard to the level of theory, technique, control, or timing required
to UNDERSTAND the lesson, let alone actually learn to execute and master the
lesson within a reasonable amount of time.
Why am I telling you all this? Because I want you to mentally relax and understand
that you are not alone. Almost everyone who plays guitar had to struggle with
what you are struggling with right now. I am telling you that you will learn
to play. You may learn faster or slower than average, but ultimately you can
get there, and it will not take a Herculean effort. Guitar playing should be
fun! Whether you are 10 or 70, just play what you can and work on the rest.
Admit to yourself that the guitar is not an easy instrument, but it is the "coolest"!
It takes great mechanical ability to play the guitar well. It's like that old
saying, "If it was easy, everyone could do it." That's my challenge
to you...be the person you learned to play - even if it is just one song!
I can make one promise to you. If you can make it through the tough beginning
stage using this series, you'll have the fundamentals to take your playing
in ultimately whatever direction makes you happiest.
Organization
of the Series: (Back to Top)
So, I can put the question back to you. Are you an absolute beginner? Do you
feel like you are struggling with the simplest aspects of playing? Then commit
yourself to completing this series. I have broken the lessons down into small
pieces with only a slight difficulty incline. I have written each lesson so
that it should take a week to master if you practice an hour a day. If it only
takes you two days to master, fantastic! If it takes you two weeks or a month,
no problem! If you think about it, everyone looks (or in this case sounds)
the same at the finish line!
Each week (except this week), the lessons will be broken up into five parts:
A. Tune up - 5 minutes
B. Warm-up and technique exercises: 10 minutes
C. Rhythm Practice - New chord 5 min - Rhythm practice: 10 minutes
D. Lead Practice - New scale/ melody practice 5 minutes, riff practice 10 minutes
E. Song Practice - 15 minutes
I know most method books pride themselves on "having you play a song in
the first ten minutes". Can we be realistic? The song you get to learn
how to play is "Go Tell Aunt Rhoadie" or "Ode to Joy".
Now, I am not knockin' those songs, but where I grew up, you would get beat
up if you played either of those! So just for the first week, I want you to
concentrate on technique. The goal is to achieve relaxed nearly perfect technique.
Each aspect represented in these five parts is further broken down into "levels".
Your goal is to achieve each level before moving onto the next.
Notice I said "nearly perfect" above. You are not ready to move to
the next level or lesson until you can perform all of the requirements with
at least 95% proficiency (usually this allows you at least one mistake). So
what is so special about 95%? Yes, it is an arbitrary number, but in my limited
experience, it seems that you actually gain the last 4-5% over an extended
period of time working with harder material. So that when you go back to it
later, it seems relatively easy - so it becomes a simple matter to gain 99%-100%
perfect technique. Call it the "experience factor." Also, you can
spend too much time trying to be perfect. Go for great now, perfect will come
later.
Notice that each aspect has an "Extra Credit" option. You do not
need to complete this to move onto the next level. It is only meant as something
for you to work on if you have mastered one aspect but are still trying to
get another up to speed before moving on.
Now that we have covered the philosophical aspects of this series, are you
ready for the lessons?
LESSON 1 (WEEK
1) (Back to Top)
Goal: Complete a series of fundamental activities
necessary to developing accuracy, timing, and control. This will lead us
to the next lesson where we will begin to play full chords and first songs.
Objectives:
1) Introduce concept of "absolute beginner"
2) Explain the purpose of this series
3) Understand the structure of each lesson
4) Understand the basics of achieving perfect technique
5) Familiarize yourself with using a metronome
6) Start to develop timing and rhythm by playing your first chord with a metronome.
7) Start to develop finger coordination and speed by playing your first blues
riff
Requirements:
1) Your guitar if acoustic, your guitar hooked into an amplifier if electric.
2) A metronome. You can either buy one (They are less than $10. But you'll
probably want to spend a little more to get one with a "wood block" or
pleasant "tapping sound". The piezo "beep" of the cheap
ones gets really annoying). or you can download a free metronome from the GuitarAlliance
website for your computer. There are other free metronomes you can download
from around the internet if you look hard enough. I don't personally practice
in front of the computer most of the time, so I use a separate metronome.
3) A clock or watch with a timer. Make sure you balance each of your aspects
of playing using the clock. When time is up, go to the next aspect of playing.
This will require discipline.
4) You may want to keep a journal of your progress.
5) A print out of this lesson for reference.
6) PowerTAB software to load the lesson tabs (if desired).
7) The PowerTAB file for this lesson.
8) To watch movies you may need to download Apple Quicktime.
Practice Notes:
1) Work on each aspect until you can achieve at least 95% proficiency at each
level of playing. When you have achieve all levels over all aspects you are
ready to move to the next lesson!
2) Relaxed technique is the goal in this lesson, not speed.
3) Pay attention to your posture and take breaks if you feel tired.
A. ERGONOMICS
OF PLAYING GUITAR - (5 Minutes) (Back
to Top)
Well are you ready to play? Remember that I said that this week's lesson structure
is a bit different. This week we have to cover what I will call "guitar
ergonomics". This essentially breaks down into how you hold the guitar
and how you hold the pick (or plectrum) if you are using one.
I realize that both of these things have an element of personal preference
and ultimately you'll have to play in a way that is comfortable for you. Nevertheless,
I submit that variations from these principles should be minor and if you train
yourself to practice with good posture and technique, your playing will come
that much easier. Also, please know that there are debates between "classical" guitar
players and "modern" guitar players regarding these issues. I am
going to assume that you are not playing classical guitar.
HOLDING THE GUITAR:
As I have alluded, there are two ways of holding the guitar. The classical
way and the modern way. See the pictures below and select the position which
feels most comfortable to you. If you have very small hands, let me suggest
you at least try the classical position because it often offers greater access
to the fretboard. There are four keys to either position:
1). Make sure the waist of the guitar is well balanced on your legs.
2) If you are sitting, it is important to slightly raise your foot off of the
floor. You can accomplish this by: crossing your leg in the casual style or
by raising your leg using some books, a small box or a special guitar footstool.
Trust me, this will make your guitar much more comfortable to play.
3) Whether standing or sitting, make sure the head of the guitar is raised.
Do not raise the head of the guitar above shoulder level. Raising the head
of the guitar in this way will offer the best access to the strings and frets
for learning purposes. This is for practice purposes, what you do when you
are actually playing is totally up to you! It may be "cool" to hold
the guitar differently on stage, especially if you are a "rocker"!
Just don't tell anyone how you practice!
4) If you are sitting, rest your forearm on the body of the guitar.
5) If standing using a good leather strap, preferably with strap locks. If
you use one of those cheap nylon straps you are likely to hurt your shoulder
and/or drop your guitar. You can also use the strap while sitting to help you
stabilize the guitar.
Modern Position

Classical Position

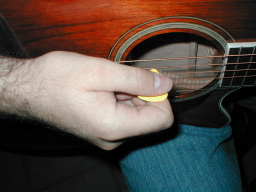
HOLDING THE PICK:
Everyone holds the pick differently. Eddie Van Halen held the pick between
his thumb and middle finger. But I suspect that the easiest way to play with
a pick is to hold the pick between your first finger and thumb as shown. Don't
grip too tightly or you will slow down your playing. Hold it firm enough that
it won't fall out, but relaxed enough so you don't feel tense in any way.
I want to make two final suggestions to you about your playing style. First,
don't over do it physically. You can hurt yourself if you try to force your
hands into doing something which they have not yet developed enough strength
or control to execute. If they feel tired or cramped, take a break. You won't
gain anything by pushing your fingers. But if you hurt them, you may have to
lay off a couple weeks from playing. That would be a real tragedy if you love
your guitar as much as I love mine! Second, please be aware of your state of
relaxation. As you play try to be aware of muscles tensing in reaction to your
playing and consciously try to relax them. This occurs most often in your back,
shoulders, arms, and hands, but can occur anywhere. Tension will slow you down
- so it is key that learn to play without it. If you get frustrated and tense,
step away for a few minutes. Stretch out, grab a drink, a fresh perspective
and come back.
Spend five minutes getting the feel of the guitar in this position. Take the
time to find the position that is most comfortable to you, yet provides access
to all the strings and frets.
Holding the Pick
B.
TUNING UP (5 minutes): (Back
to Top)
Before you play you must tune up. Please read the section on GuitarAlliance
on tuning your guitar.
Never, ever, ever.....and I mean never play with
your guitar out of tune. Especially in these early stages. For the
purposes of these lessons, I have recorded some tuning notes for you
to match your guitar to mine. You can use the included PowerTAB file
or the tuning notes below. Personally, I use an electronic tuner
each time I play.
Before we tune up, I have to let you know that
we are going to use tablature or TAB in this lesson. TAB is notation
specially designed for playing guitar. If you need to, please read
the section in GuitarAlliance that explains tablature. I will give
a brief overview here. It's actually pretty easy. You will note
that I have included some music notation below. Each note represents
one of the open strings on the guitar from lowest to highest.
Pay attention to the lines that say TAB. Each
line refers to a string on the guitar. The most confusing thing
for people is to remember that on the TAB, the bottom line is the low
E string and the top line is the high E string, whereas when you are
holding your guitar the top string is the low E and the bottom string
is high E. (Don't yell at me - I didn't invent it!)
Since I don't want to confuse you, here's another
way to think about TAB. If you lay your guitar flat with the
head pointing to the left, the strings on your guitar would then match
the score - see the picture below. The numbers on the lines tell
you where to fret the notes. Since we are tuning the guitar,
we are going to play all "open" notes, which are designated
by a zero (0).
If you need a further introduction to TAB, please
see the GuitarAlliance page that discusses this in much greater depth.

Match the TAB lines with your
guitar
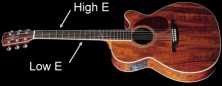
We will start from the low E string (or sixth string).
GA1-TuningLoE.mp3
We will then go to the:
A string (the fifth string);
GA1-TuningA.mp3
D string (the fourth string);
GA1-TuningD.mp3
G string (the third string);
GA1-TuningG.mp3
B string (the second string);
GA1-TuningB.mp3
High E string (the first string).
GA1-TuningHiE.mp3
All together now!
GA1-AllStrings.mp3
Extra Credit: De-tune your guitar's low
E string. Turn the knob so that the sound gets LOWER in pitch (don't
go to a higher pitch, you might over tighten and snap your string). Play
the tuning note one time. When the tuning note STOPS, try to tune the
Low E string UP to the correct pitch using your "ear". Play
the tuning note again to see if they match. When people say they play
by "ear", they mean they play by their memory. So try to tune
your guitar up so that it matches the recent memory of what the Low E
should sound like! If you get really good, you'll be able to tune your
guitar without a tuner! (Don't worry, I can't do it yet either! But it's
fun to try!)
C. WARM UP (15
Minutes): (Back to Top)
What, you ask? We are actually going to play now? Absolutely! As I mentioned
we are going to start off easy this week.
WARM UP 1: PICKING PRACTICE (7 Minutes)
We are going to learn what is called "alternate picking". Some books
wait some time before showing you this "secret speed" technique,
but I believe that you should learn how to alternate pick from the beginning.
What I mean by alternate picking is to pick a string on the downstroke of the
pick motion and to pick the same string (or a maybe different string) on the
upstroke of the pick motion. Now a word about the nature of this motion. Try
not to use your fingers to execute the motion. The majority of the motion should
come from your wrist. Imagine how you turn a doorknob. Do you use your fingers
even though that is what grasps the knob? No. You use your wrist. It is the
same concept in this case. Stay relaxed and focus on technique, not speed.
Speed will come much quicker if you can achieve great technique. See
the video for the wrist motion.
P1010006.MOV
Example 1:
We are going to start by playing only the low E string. Remember each line
on the tabulature (or TAB) represents a string on the guitar - where the top
string is the high E and the bottom string is the low E. A zero (0) means to
play the string open (no fretted notes). In this case we are going to play
only open notes on the low E string. Play the audio and I will walk you through
it. Don't worry about tempo or timing with this, just get used to the feel
of alternate picking.
ga1-example1.mp3
Example 2:
To execute this exercise without the audio, set your metronome to 50 beats-per-minute
(BPM). Count aloud with the metronome saying "1" "2" "3" "4" with
each beat. If you can manage it, tap your foot along with the metronome while
you count. At each "1" beat, play the downstroke. On the next "1" beat,
play the upstroke. Don't rush this, be conscious of how relaxed you can stay
while counting and picking. This will help develop your sense of timing as
well as your alternate picking ability. Discipline yourself to wait for the "1".
It's harder than you think.
Once you can do this at 50 BPM, work on raising the metronome speed in no more
than 5 BPM increments until you have achieved all of the levels below. Use
the TAB listed above in example one.
|
Level
Chart
for Warm Up 1 |
|
Level |
BPM |
|
1 |
50 |
|
2 |
60 |
|
3 |
70 |
|
4 |
80 |
|
5 |
90 |
|
6 |
100 |
|
7 |
110 |
Here it is at 50 BPM:
ga1-example2a.mp3
And again, at 110 BPM:
ga1-example2b.mp3
Extra Credit: We
will be working on this in the next lesson, but you can sneak ahead
if you have this exercise mastered early. Try to play the downstroke
on every second beat instead of every fourth beat. That is, play
the downstrokes on the "1" and "3" beats. Play
the upstrokes on the "2" and "4" beats. Use the
metronome chart above and see how far you can get in a week!
WARM UP 2: FRETTING PRACTICE (6 minutes):
I know you are asking yourself, "Umm, Dan, this is all great, but don't
people usually play guitar with two hands?" Yes, I confess, it's true.
But at this stage of development it is very important to develop hand "independence".
To paraphrase one great guitar player, "once your left hand learns what
needs doing, it doesn't care about the right hand!" So for this week I
just want you to practice fretting notes with your left hand without trying
to play the note with the right hand. Incidentally, if you are having trouble
with a piece of music, it is often good to separate the hands and work on them
independently.
The "frets", of course, are the thin metal wires on your fretboard.
You should get used to placing your finger just behind the fret. Sometimes,
especially when you are playing chordsl, you cannot physically get your fingertips
right behind the fret. That is normal, but you should make sure that your fingers
are positioned such that the notes sound cleanly with no "buzzing" or "muting".
Here is the tabulature for the lesson. Remember that each line represents a
string on the guitar. You will start on the Low E (sixth) string and progress
to each subsequent string using the pattern given in the TAB. A zero, if you
remember represents an unfretted note, a 1 means that the note is fretted at
the first fret, a 2 the second fret, a 3 the third fret.

What I want you to do is practice fretting with ONLY the left hand. There are
two basic rules you must try to remember for now (until we break them later!).
These are the ONE FINGER PER FRET RULE and the LEAVE FINGERS DOWN UNTIL THEY
USED AGAIN RULE. This means that for this example, your index finger should
only fret notes on the first fret. Your middle finger should only fret notes
on the second fret, and your ring finger should only fret notes on the third
fret. Leaving your fingers down will help build coordination and speed. Here's
a video of the finger movement I want you to employ (Apple Quicktime).
P1010007.MOV
Focus on slowly placing your finger tips just behind the fret. Use the metronome
to maintain time. Again set your metronome at 50 and follow along with the
audio. Remember, do not play the note just concentrate on fretting correctly!
I will be playing the notes in the example so you can follow along. Stay relaxed
and focused. Your goal is not speed, but rather to land each finger in perfect
position.
Remember to execute this exercise without the audio. Set your metronome to
50 beats-per-minute (BPM). Count aloud with the metronome saying "1" "2" "3" "4" with
each beat. If you can manage it, tap your foot along with the metronome while
you count. At each "1" beat, don't fret a note - this is the open
string. On "2", press down on the first fret of the current string.
On "3" press down the middle finger on fret 2. On "4" press
the ring finger down on fret 3. Now DO NOT move your fingers. On the next "2" count
move only your first finger to the fret 1 of the next string, on "3" the
second finger to fret 2 the next string, and on "4" the third finger
to fret 3 of the next string.
Don't rush this, be conscious of how relaxed you can stay while counting and
fretting. This will help develop your sense of timing as well as your left
hand coordination. Trust me, this can be a hard exercise to do in time, especially
as the metronome speed increases. If you need to, slow it down by only moving
your fingers on every other beat (i.e., "1" and "3").
Once you can do this at 50 BPM. Work on raising the metronome speed in no more
than 5 BPM increments until you have achieved all of the levels below.
|
Level Chart
for Warm Up 2 |
| Level |
BPM |
| 1 |
50 |
| 2 |
60 |
| 3 |
70 |
| 4 |
80 |
| 5 |
90 |
| 6 |
100 |
| 7 |
110 |
Here it is at 50BPM:
fretting50.mp3
Here it is at 110BPM:
fretting110.mp3
Extra Credit: If you were to play these
as notes like I did in the audio example, you would be playing what is
called a "chromatic run". For a glimpse at next weeks warm
up, try playing this run using alternate picking.
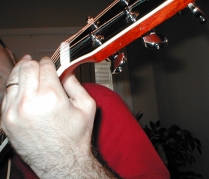
WARM UP 3: FIRST FINGER BARRE (2 Minutes)
Eventually you want to be able to play barre chords. But if you are like me
it will take a long time before you have sufficient strength in your first
finger to do this. But if you spend two minutes with this exercise every day,
you'll get there much faster.
Look at the picture below. See how I am "pinching" the guitar between
my first finger and my thumb?
The Barre
Want Video?
P1010011.MOV
Try to do this and see how many strings you can get to sound. Again, if you
are like - it won't be many. It is especially difficult at the first fret.
DO NOT FORCE YOUR FINGER. I actually hurt my finger trying to force it,
and had to lay off playing the guitar for two weeks. We are going to hold
each first finger barre for 10 seconds. Strum the strings one time to see
how many strings you get to sound. As we move up the fretboard it will
get easier.
Audio Example:
barre1.mp3
This was shortened to conserve bandwidth. But you should hold each fret for
ten seconds up to the twelfth fret. That is 12x10=120 seconds or two minutes.
You are done with warm-up! Shake your hands. Stand up and stretch if you need
to!
Extra Credit: The notes on the low E string
go (from the first fret) F F# G G# A A# B C C# D D# E. Call out these
notes as you execute the barre at each fret. Knowing these notes will
help you greatly when you get to E shape barre chords! Follow along with
the audio if you can.
barre2.mp3
D.
RHYTHM PRACTICE: (15 minutes):(Back to
Top)
Your first chord! Your first chord is what we are going to call "Easy" G.
It looks like this:
Easy G Chord (Press down only
the at the third fret)
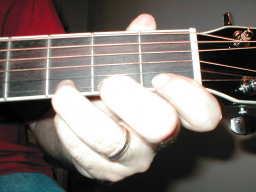
It is called "easy" because you only need one finger to fret this
chord. Also when you strum you are only going to strum the bottom four strings.
That is, you are going to miss E and A, and strum D, G, B , and E.
When you strum along to any song, you are going to use a pattern. To start
you off, we are going to use a very simple strumming pattern.
Set your metronome to 50 beats-per-minute (BPM). Count aloud with the metronome
saying "1" "2" "3" "4" with each beat
(are you noticing that everything we do requires counting?) Again, try to tap
your foot along with the metronome while you count. You may need to practice
this separate from the guitar if you are having trouble. At each "1" beat,
strum the guitar. Stay relaxed. The strum motion should not be stiff. It should
be like you are shaking water off of your hand. On the next "1" beat,
play another downstroke. Don't rush. Like with the picking exercise, be especially
conscious of how relaxed you can remain. This will greatly develop your sense
of timing as well as your ability to strum "in time" which is one
of the hardest things for new guitarists to learn. Force yourself to only play
a single strum on the "1" beat, while counting aloud. Again, this
can be very difficult.
Here's video of the basic strumming motion.
P1010008.MOV
Follow along with the audio exercise.
Once you can do this a 50 BPM. Work on raising the metronome speed in no more
than 5 BPM increments until you have achieve all of the levels below.
|
Level Chart
for Rhythm Practice |
| Level |
BPM |
| 1 |
50 |
| 2 |
60 |
| 3 |
70 |
| 4 |
80 |
| 5 |
90 |
| 6 |
100 |
| 7 |
110 |
Here it is at 50BPM:
rhythm50.mp3
Here it is at 110BMP:
rhythm110.mp3
Extra Credit: Start over at 50 BPM and
instead of playing only on the "1" beat, play downstrokes only
on the "1" and the "3" beats! Here's an audio example!
rhythm-extra.mp3
E.
LEAD PRACTICE: (20 minutes): (Back
to Top)
What is a "riff"? Think of a riff as
a series of notes that represent a defined musical thought or statement.
It is often the most recognized part of a song. If you have access
to GuitarAlliance's sister site, Riff-O-Matic you can attempt (or at
least listen to!) some of the coolest riffs. To start out your single
note playing - usually called lead guitar - we are going to introduce
a very easy, but very cool little blues riff. It could form a nice
little background line for any blues song in the key of E. (If you
don't know what I mean by a key --- don't panic! --- you don't need
to know this right now).
Below is the tablature. We are still following the one finger per fret rule
except in this case we are using the first finger and middle finger to play
the 3rd and 4th frets. This is marked in the TAB as a 1 and 2 below the bottom
line:

Start your metronome at 50 BPM and play one note with each tick using strict
alternate picking. Count out loud "1" "2" "3" "4" and
tap your foot.
Play along with this audio example first. Notice that I added a little
bit to the tablature at the end, see if you can use your "ear" to
figure it out!
|
Level Chart
for Lead Practice |
| Level |
BPM |
| 1 |
50 |
| 2 |
60 |
| 3 |
70 |
| 4 |
80 |
| 5 |
90 |
| 6 |
100 |
| 7 |
110 |
Here it is at 50 BPM:
lead50.mp3
And again at 110 BPM:
lead110.mp3
Extra Credit: Listen to the audio example
below I am playing the same riff, except I am using a "swing feel" or "shuffle
feel". Don't worry about the theory, just try and copy it! Listen
to how it sets a completely different groove.
leadswing.mp3
CONCLUSION: (Back to
Top)
I'm so glad you completed this initial lesson.
I'll bet you found some of it to be pretty easy. I know some of it
was harder than it initially seemed! If you completed all of the exercises
above you have set a strong foundation for the next lesson. I am only
going to make it a little bit harder. As I promised you in the beginning,
no big jumps! If you can do this lesson - I know you'll be able to
do lesson two! Oh yeah, don't be afraid to come back and practice this
lesson if you feel the need to focus on a particular aspect of your
playing. Remember, the little bit of extra time spent now learning
to place your fingers in exactly the right space, in time with the
metronome, could possibly save you YEARS of correction later on!
About me:
I have been member of GuitarAlliance since January
2003. My wife bought me a guitar for my birthday about two years
ago, but it wasn't until about a year ago that finally picked it up
and started playing. Now I can't put it down! I own four
guitars now, my Yamaha EF10 acoustic (the birthday gift), an Epiphone
Dot 335 Semi-hollow body, a Cort X6 Electric, and an Alvarez AF60CK
Koa (it's the one in the pictures). I have a beautiful wife and
a daughter that I like to spend time with too!
If you want, you can visit me at my website at:
http://www.guitargearheads.com |